
Micro-ROS
Micro-ROS is an extension of ROS 2 (Robot Operating System 2) specifically designed for resource-constrained embedded systems such as microcontrollers. Micro-ROS aims to extend the ROS 2 ecosystem to embedded devices, enabling easier and more consistent integration into robotic architectures.
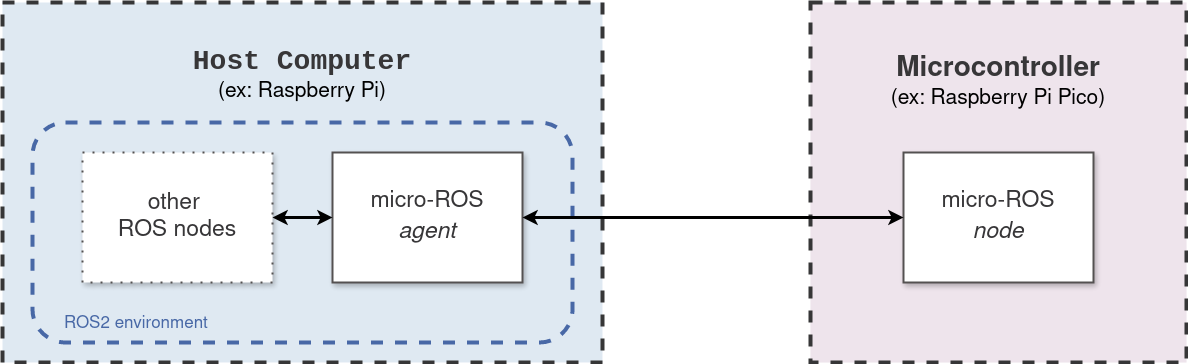
Here is a simple representation of the interface between a host computer and a microcontroller using Micro-ROS:
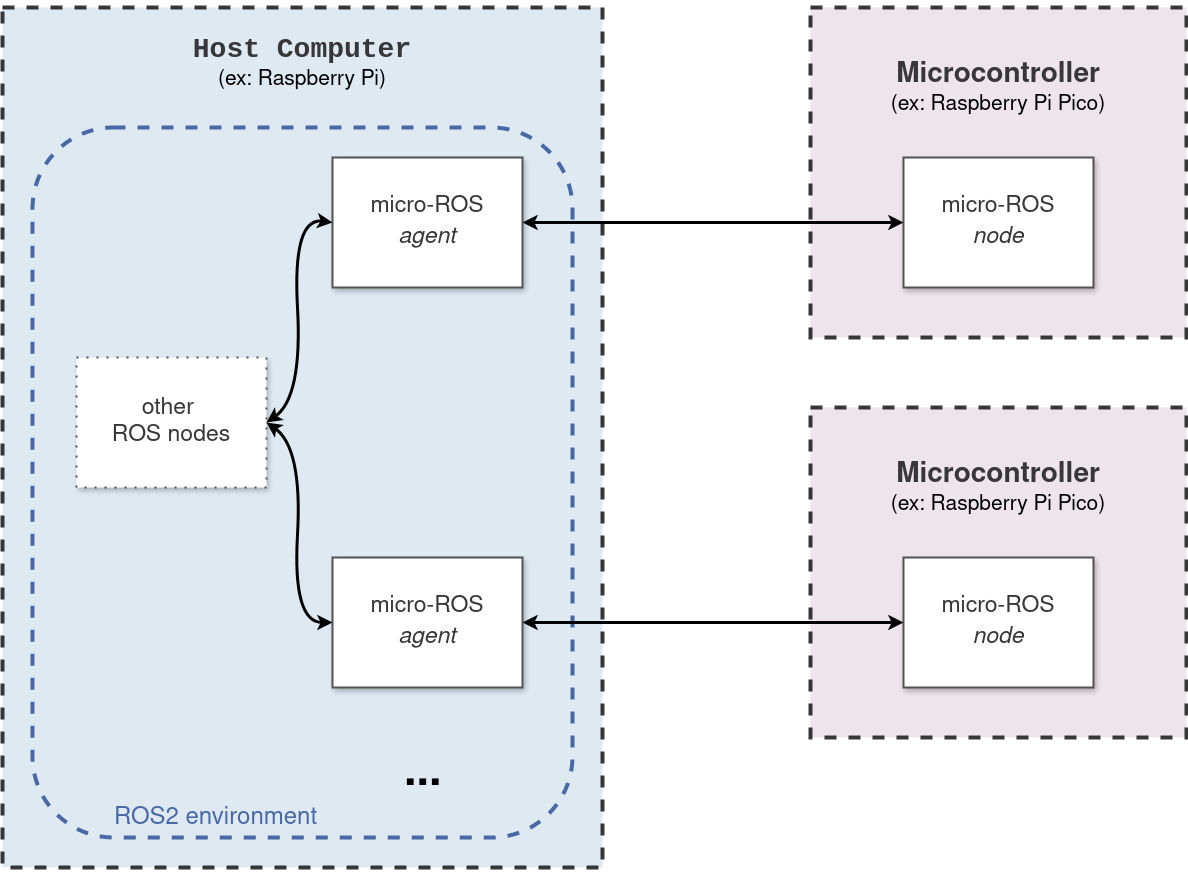
Micro-ROS does not limit interfacing to a single microcontroller; multiple microcontrollers can be used as shown below:
This tutorial for ROS2 Humble will guide you through configuring Micro-ROS on both the host computer and a microcontroller and specifically for the Raspberry Pi Pico. Finally, we'll explore using custom messages with Micro-ROS via cross-compilation.
Host Computer Side (micro-ROS agent)
To run the Micro-ROS agent from the main workspace, you need to include the necessary packages. I recommend to organize them into a folder named uros for clarity. Two packages are required:
micro-ROS-Agent:git clone -b humble git@github.com:micro-ROS/micro-ROS-Agent.gitmicro_ros_msgs: Required by micro-ROS-Agentgit clone -b humble git@github.com:micro-ROS/micro_ros_msgs.git
Here's how your main workspace structure should look:
ros2_ws
└── src
    └── uros
        ├── micro-ROS-Agent
        └── micro_ros_msgs
After running
colcon build
Use this command to launch the agent for the device /dev/ttyACM0:
ros2 run micro_ros_agent micro_ros_agent serial --dev /dev/ttyACM0
Microcontroller Side (micro-ROS node on Raspberry Pi Pico)
For developing micro-ROS nodes on the microcontroller side, create a dedicated working folder, e.g., pico. Here, you'll work with two libraries:
pico-sdk:
Libraries and build system necessary for programming on the RP2040.git clone git@github.com:raspberrypi/pico-sdk.gitMake this library accessible to other files by adding the following environment variable to your
.bashrc:export PICO_SDK_PATH=$HOME/pico/pico-sdkmicro_ros_raspberrypi_pico_sdk:
Precompiled micro-ROS library for Raspberry Pi Pico.git clone -b humble git@github.com:raspberrypi/pico-sdk.gitCopy
libmicroros,pico_uart_transports.h, andpico_uart_transports.cppfrom this folder to your micro-ROS node project folder.
Your workspace structure for creating micro-ROS nodes should look like this:
pico
├── pico-sdk
├── micro_ros_raspberrypi_pico_sdk
│   ├── pico_uart_transports.h (copy directly to your Pico project folder)
│   ├── pico_uart_transports.cpp (copy directly to your Pico project folder)
│   └── libmicroros
│       ├── include
│       └── libmicroros.a
└── my_uros_node_folder
    ├── libmicroros
    │   ├── include
    │   └── libmicroros.a
    └── pico_uart_transport
        ├── pico_uart_transports.h
        └── pico_uart_transports.cpp
Once set up, develop your micro-ROS node .cpp and its associated CMakeLists. I won't describe the creation of the .cpp node and the CMakeLists here, I'll leave that to the different dedicated templates. Assuming your CMakeLists is configured and your .cpp node is ready, generate the .uf2 file for your node:
cd my_uros_node
mkdir build
cd build
cmake ..
make
Your .uf2 file for the node will be in the build folder:
pico
└── my_uros_node
    └── build
        └── main.uf2
Copy this file to your Raspberry Pi Pico to deploy your Micro-ROS. Congratulations on using Micro-ROS!.
Custom message on micro-ROS (on Raspberry Pi Pico)
Using custom ROS messages for communication between nodes can be very useful, and Micro-ROS nodes are no exception. Here's how to integrate your custom message into Micro-ROS:
To avoid cluttering the main ROS workspace, I recommend to work in a dedicated ROS 2 workspace, here named uros_ws.
For cross-compilation, you'll need:
micro_ros_setup:
Tools and utilities for micro-ROS cross-compilation.git clone -b humble git@github.com:micro-ROS/micro_ros_setup.git- my_custom_message:
Your custom message type. Follow the official ROS 2 tutorial here to create it.
my_colcon.meta:
Specific compilation parameters file.{ "names": { "tracetools": { "cmake-args": [ "-DTRACETOOLS_DISABLED=ON", "-DTRACETOOLS_STATUS_CHECKING_TOOL=OFF" ] }, "rosidl_typesupport": { "cmake-args": [ "-DROSIDL_TYPESUPPORT_SINGLE_TYPESUPPORT=ON" ] }, "rcl": { "cmake-args": [ "-DBUILD_TESTING=OFF", "-DRCL_COMMAND_LINE_ENABLED=OFF", "-DRCL_LOGGING_ENABLED=OFF" ] }, "rcutils": { "cmake-args": [ "-DENABLE_TESTING=OFF", "-DRCUTILS_NO_FILESYSTEM=ON", "-DRCUTILS_NO_THREAD_SUPPORT=ON", "-DRCUTILS_NO_64_ATOMIC=ON", "-DRCUTILS_AVOID_DYNAMIC_ALLOCATION=ON" ] }, "microxrcedds_client": { "cmake-args": [ "-DUCLIENT_PIC=OFF", "-DUCLIENT_PROFILE_UDP=OFF", "-DUCLIENT_PROFILE_TCP=OFF", "-DUCLIENT_PROFILE_DISCOVERY=OFF", "-DUCLIENT_PROFILE_SERIAL=OFF", "-UCLIENT_PROFILE_STREAM_FRAMING=ON", "-DUCLIENT_PROFILE_CUSTOM_TRANSPORT=ON" ] }, "rmw_microxrcedds": { "cmake-args": [ "-DRMW_UXRCE_MAX_NODES=1", "-DRMW_UXRCE_MAX_PUBLISHERS=10", "-DRMW_UXRCE_MAX_SUBSCRIPTIONS=5", "-DRMW_UXRCE_MAX_SERVICES=1", "-DRMW_UXRCE_MAX_CLIENTS=1", "-DRMW_UXRCE_MAX_HISTORY=4", "-DRMW_UXRCE_TRANSPORT=custom" ] }, "action_led_interfaces": { "cmake-args": [ "-DROSIDL_TYPESUPPORT_SINGLE_TYPESUPPORT=ON" ] } } }
my_toolchain.cmake:
Project-specific cross-compilation configuration for an ARM Cortex-M0+ microcontroller architecture.include($ENV{PICO_SDK_PATH}/cmake/preload/toolchains/find_compiler.cmake) set(CMAKE_SYSTEM_NAME Generic) set(CMAKE_CROSSCOMPILING 1) set(CMAKE_SYSTEM_PROCESSOR cortex-m0plus) set(CMAKE_TRY_COMPILE_TARGET_TYPE STATIC_LIBRARY) if (NOT PICO_GCC_TRIPLE) if (DEFINED ENV{PICO_GCC_TRIPLE}) set(PICO_GCC_TRIPLE $ENV{PICO_GCC_TRIPLE}) message("PICO_GCC_TRIPLE set from environment: $ENV{PICO_GCC_TRIPLE}") else() set(PICO_GCC_TRIPLE arm-none-eabi) message("PICO_GCC_TRIPLE defaulted to arm-none-eabi") endif() endif() pico_find_compiler(PICO_COMPILER_CC ${PICO_GCC_TRIPLE}-gcc) pico_find_compiler(PICO_COMPILER_CXX ${PICO_GCC_TRIPLE}-g++) set(CMAKE_C_COMPILER ${PICO_COMPILER_CC} CACHE FILEPATH "C compiler") set(CMAKE_CXX_COMPILER ${PICO_COMPILER_CXX} CACHE FILEPATH "C++ compiler") SET(CMAKE_C_COMPILER_WORKS 1 CACHE INTERNAL "") SET(CMAKE_CXX_COMPILER_WORKS 1 CACHE INTERNAL "") set(FLAGS "-O2 -march=armv6-m -mcpu=cortex-m0plus -mthumb -ffunction-sections -fdata-sections -fno-exceptions -nostdlib -D'RCUTILS_LOG_MIN_SEVERITY=RCUTILS_LOG_MIN_SEVERITY_NONE'" CACHE STRING "" FORCE) set(CMAKE_C_FLAGS_INIT "-std=c11 ${FLAGS} -DCLOCK_MONOTONIC=0 -D'__attribute__(x)='" CACHE STRING "" FORCE) set(CMAKE_CXX_FLAGS_INIT "-std=c++14 ${FLAGS} -fno-rtti -DCLOCK_MONOTONIC=0 -D'__attribute__(x)='" CACHE STRING "" FORCE)
Here's how your workspace structure should look for cross-compilation:
uros_ws
├── src
│   ├── micro_ros_setup
│   └── my_custom_message
├── my_colcon.meta
└── my_toolchain.cmake
Run the following commands to build and generate the necessary files:
colcon build
ros2 run micro_ros_setup create_firmware_ws.sh generate_lib
This will create a firmware directory at the root of your workspace:
uros_ws
└── firmware
Next, run:
ros2 run micro_ros_setup build_firmware.sh $(pwd)/my_toolchain.cmake $(pwd)/my_colcon.meta
This will generate the libmicroros.a file and an include directory within the firmware/build folder:
uros_ws
└── firmware
    └── build
        ├── include
        └── libmicroros.a
Copy the include directory and libmicroros.a file to your Pico project folder. Now, proceed to generate the .uf2 file for your micro-ROS node as described earlier.
References
This project was inspired by the following resources:
- micro.ros.org - Official Micro-ROS documentation.
- MicroROS Custom Msg on Raspberry PI Pico - Dr. Jon Durrant work.
- Micro ROS and Robot Operating System on Raspberry PI Pico - Dr. Jon Durrant work.